Lessen Pre-Construction Walk
A native iOS experience allowing Field Project Managers to perform Pre-Construction inspections on the Lessen platform.
In 2021, Lessen launched the Pre-Construction Walk experience inside of the Field Project Manager app, a native iOS application designed for the internal Field Project Management (FPM) team. The primary device for this app was the iPad Air, provided to each user. The main goal was to streamline the pre-construction inspection process, reducing inspection times and increasing the number of properties inspected per day. This was an eight-week design effort.
2 Designers
9 Engineers
1 Product Manager
1 Content Strategist
My Role: Lead Product Designer
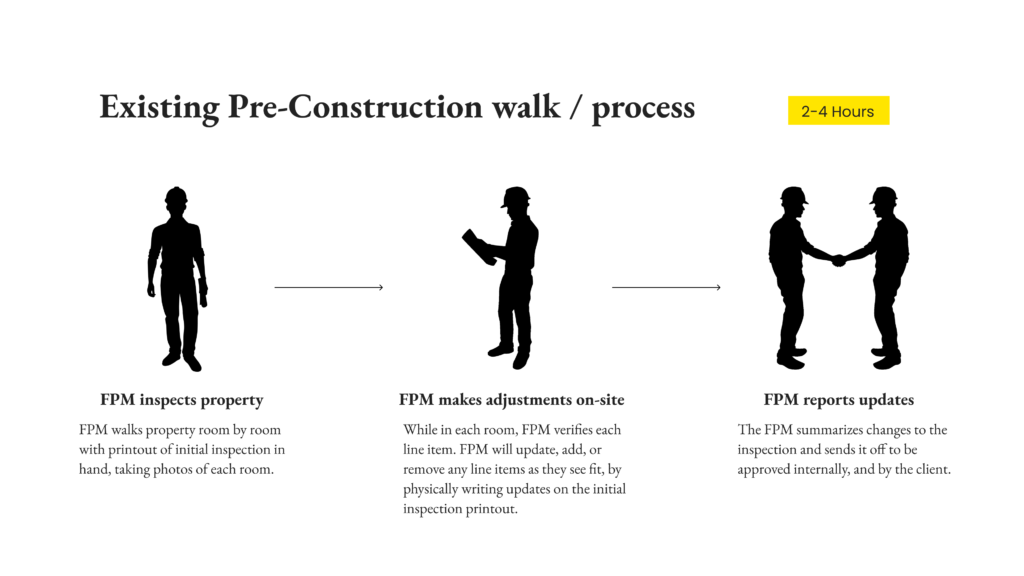
Before the development of the Pre-Construction Walk experience, FPMs relied on pen and paper for property inspections, leading to lengthy post-walk reconciliation processes (comparing new documented work to previously documented work). This manual method often resulted in delays, inaccuracies and inefficiencies, preventing FPMs from meeting deadlines and inspecting more properties.
Due to tight deadlines, I used remote user surveys and interviews to understand the needs of FPMs. The goal was to cut inspection times drastically and provide a flexible tool that could serve as the foundation for future scalable inspection services at Lessen. Regular collaboration with key stakeholders ensured alignment across product, design, engineering, and the internal FPM teams.
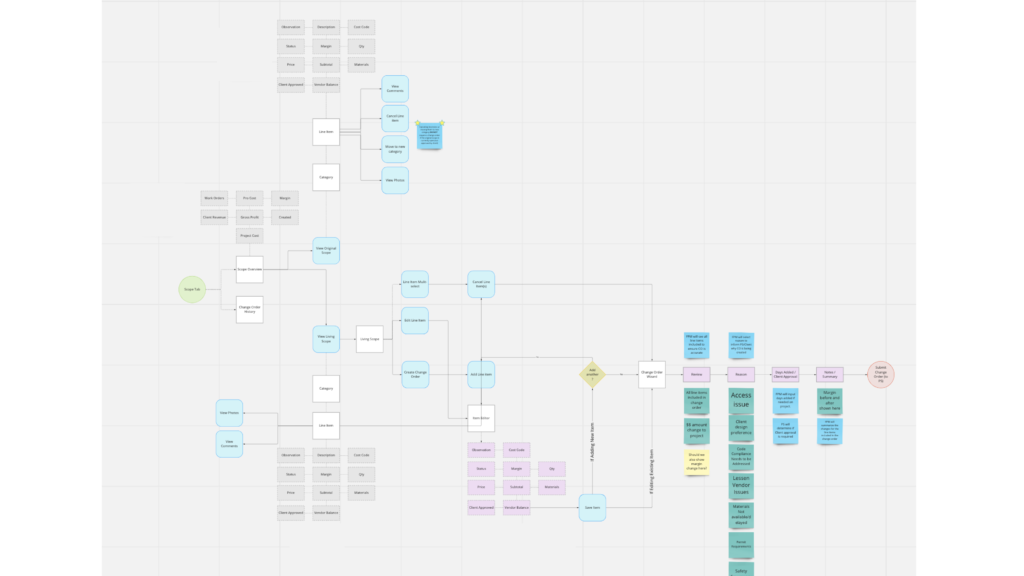
Frequent feedback loops were established with design and engineering teams. Wireframes were created and reviewed with various stakeholders including the product manager, engineering manager and the larger design and engineering teams. Prototypes were then tested with internal FPMs. Tools used included Figma for design and prototyping, Miro for whiteboarding, Zeplin for engineering handoff
Time constraints, designing for offline experiences, and understanding user needs without onsite observation were significant challenges. Empathizing with users through remote research and validating assumptions through frequent testing helped overcome these obstacles.
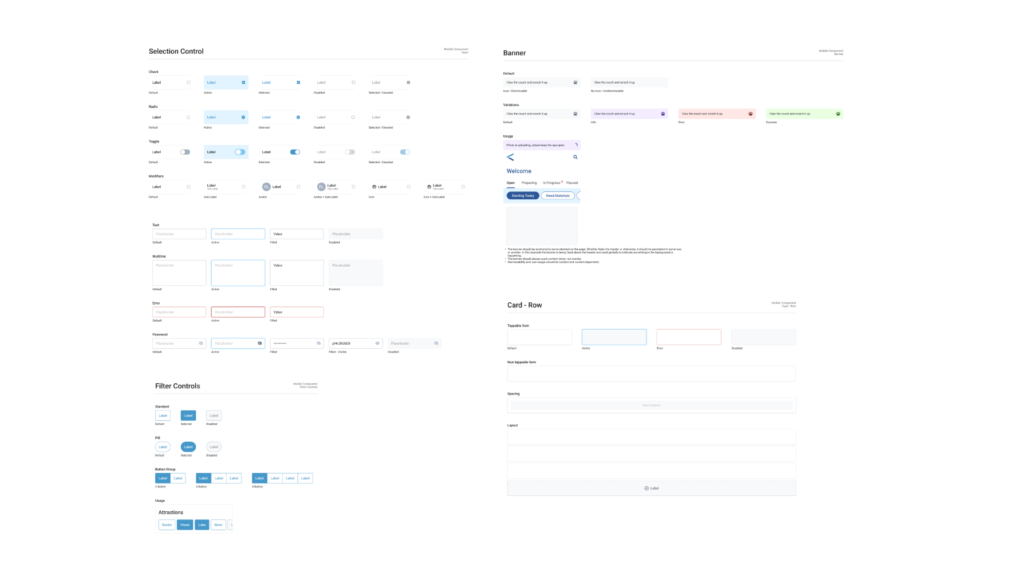
Lessen had an in-house created design system named Rivet that was utilized, maintained and carefully contributed to during this project.
Frequent meetings with engineering, including daily stand-ups, design reviews, sprint planning sessions, grooming and bug bashes ensured continuous alignment and clarity. I also paired closely with engineers throughout development phases to address any design issues that could arise.
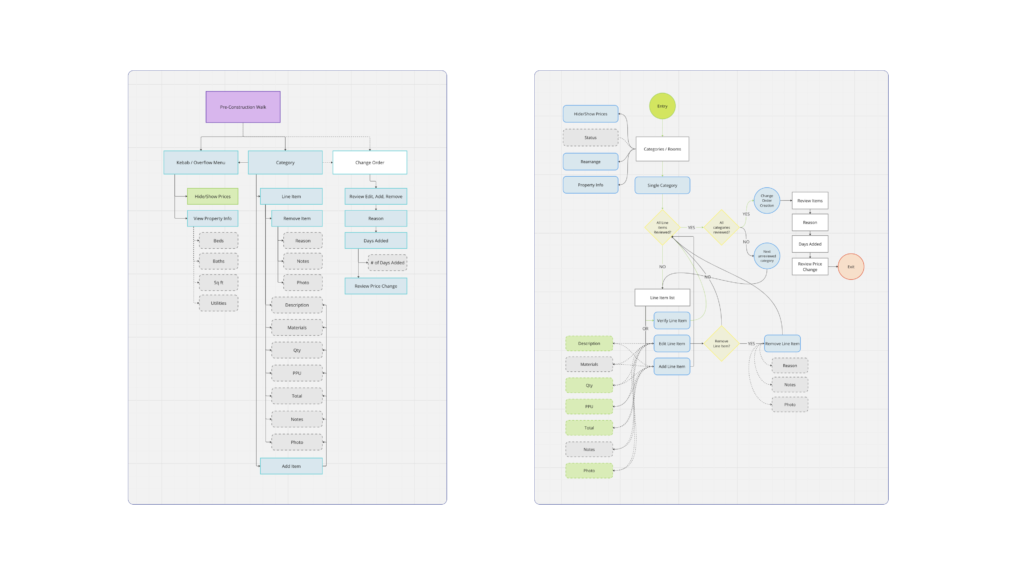
The Pre-Construction experience needed to:
1. Allow FPMs to navigate room-by-room, verifying, editing, adding, or removing line items.
2. Provide quick line item verification.
3. Enable rearrangement of categories (rooms).
4. Facilitate fast post-walk reconciliation.
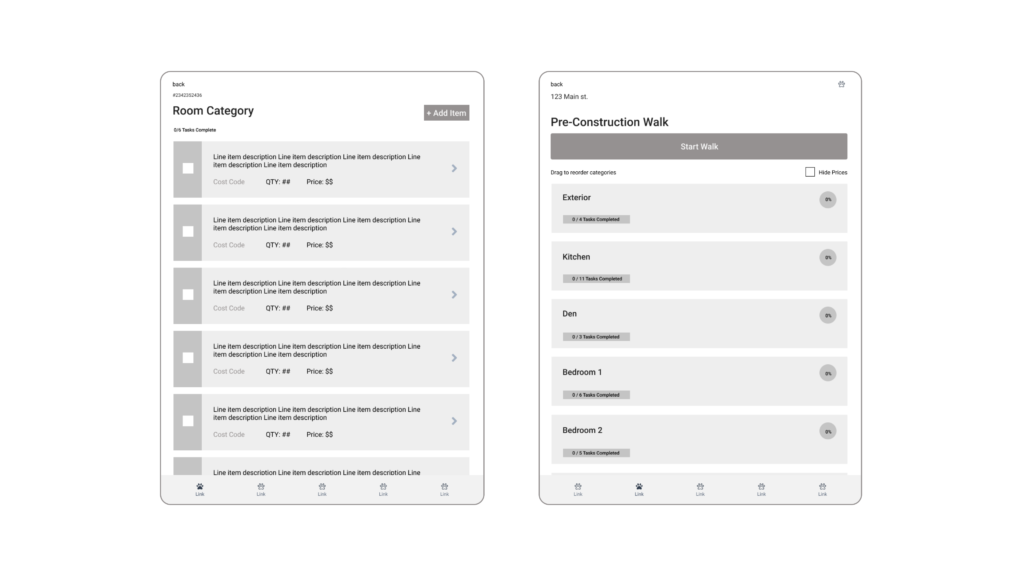
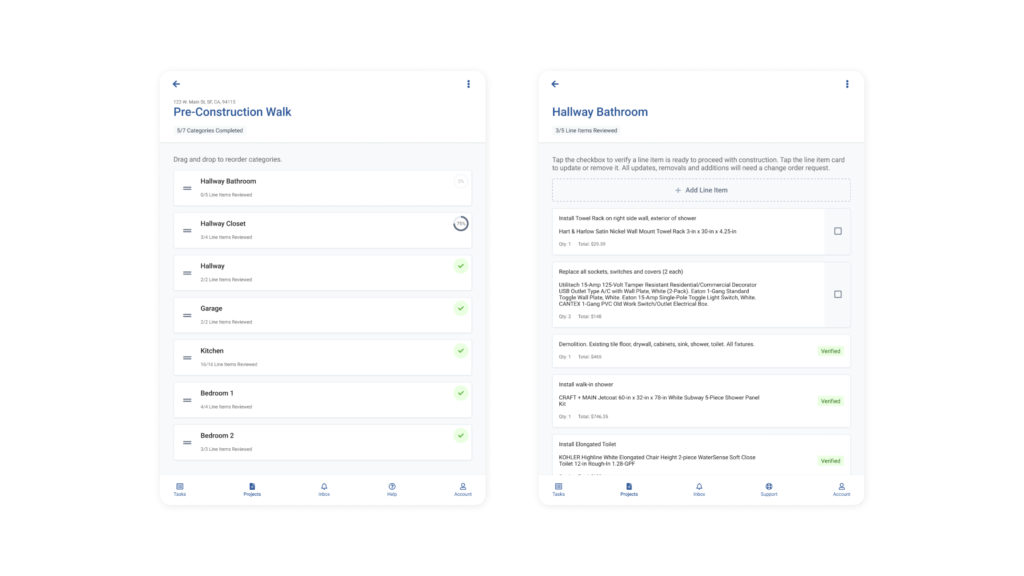
When users launched the Pre-Construction Walk feature they were greeted with a list of rooms and areas of the property that was generated during the initial property inspection. A Pre-Con walk was important because the properties would often change condition in between an initial inspection and when construction was set to begin.
Each room (or category) was placed on a card in a list. Then name of the category was prominent with a snippet of line items that need to be reviewed if once the user taps the card. A progress meter was placed on each card to better inform users how many tasks needed to be completed, and how many categories had tasks that were not yet completed.
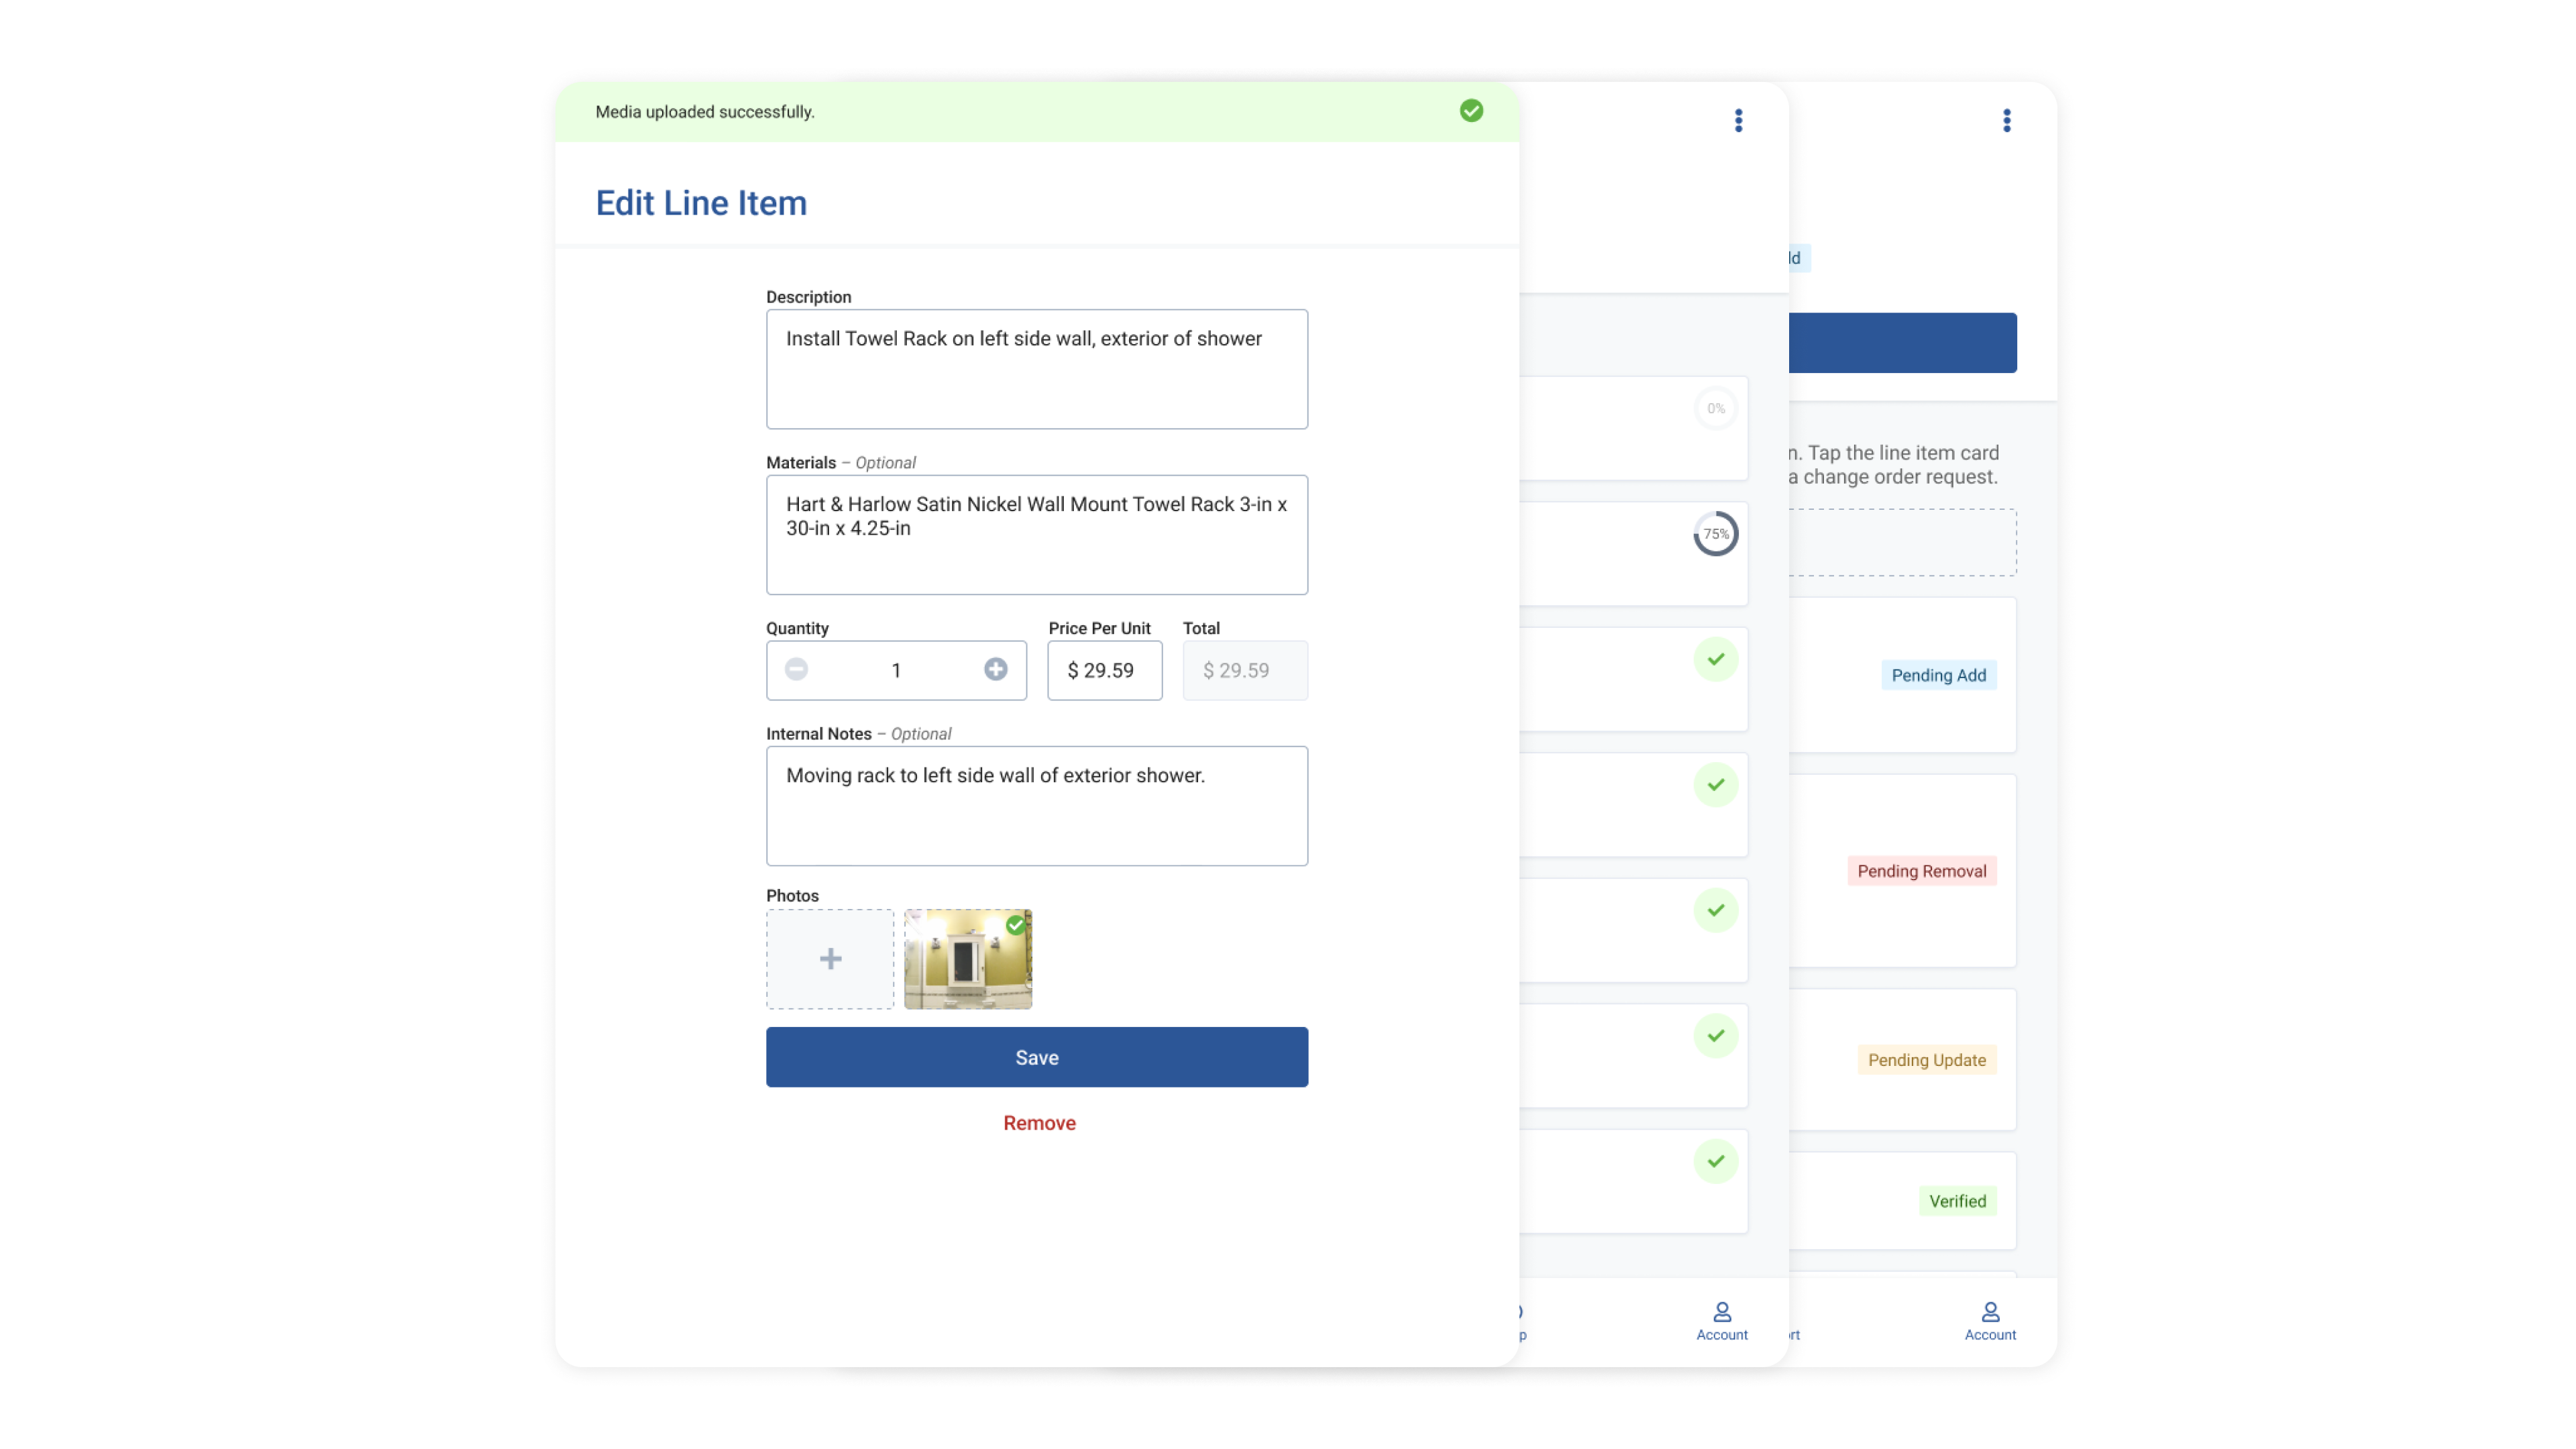
Once a user tapped into a category, they would see specific work that was documented as needing completion for the renovation to be considered a success. The line items each contained a labor description, product description, quantity and price. Prices could be toggled visible or non visible. Users could visually verify that the work still needed to be completed and check the box to confirm.
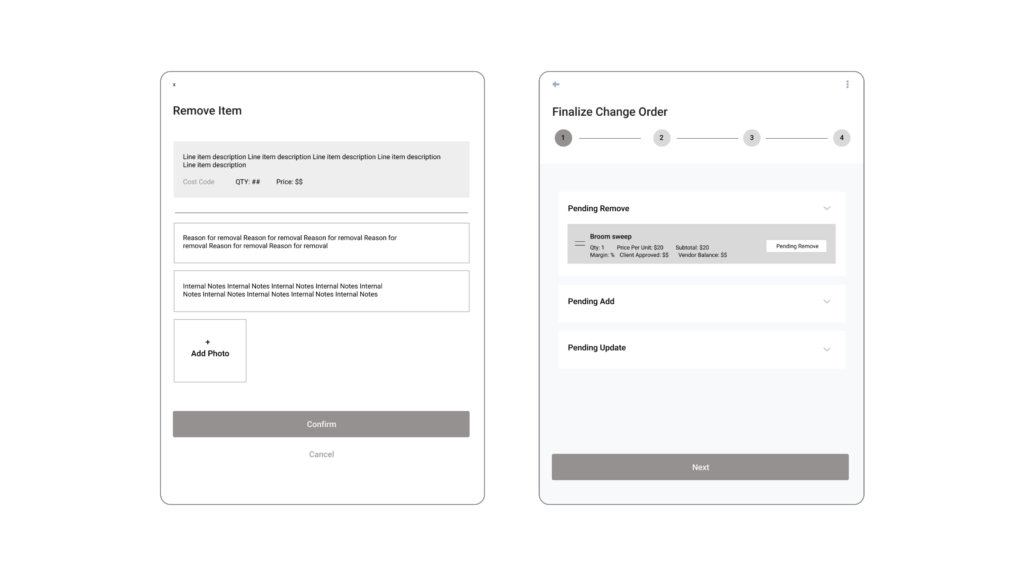
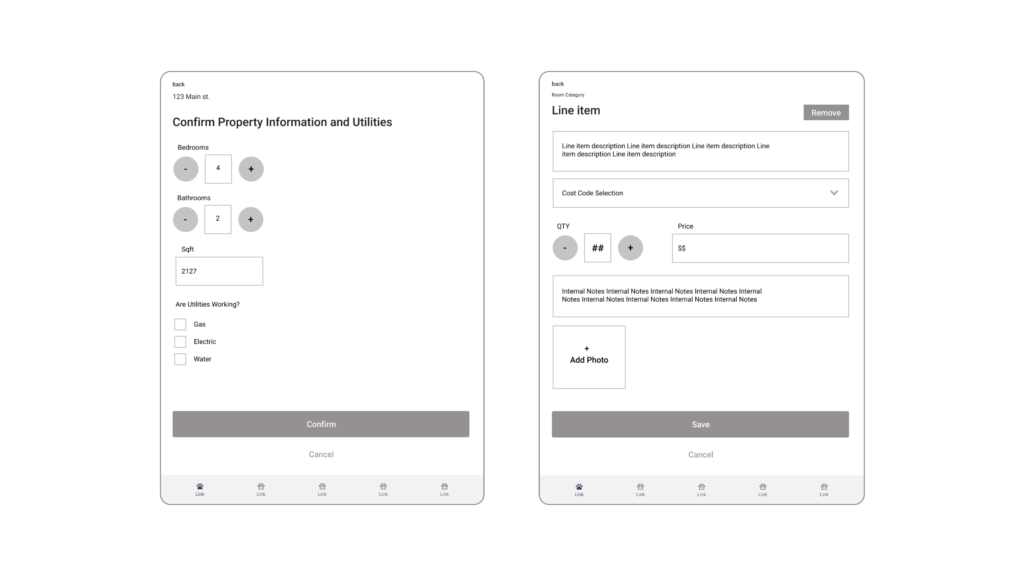
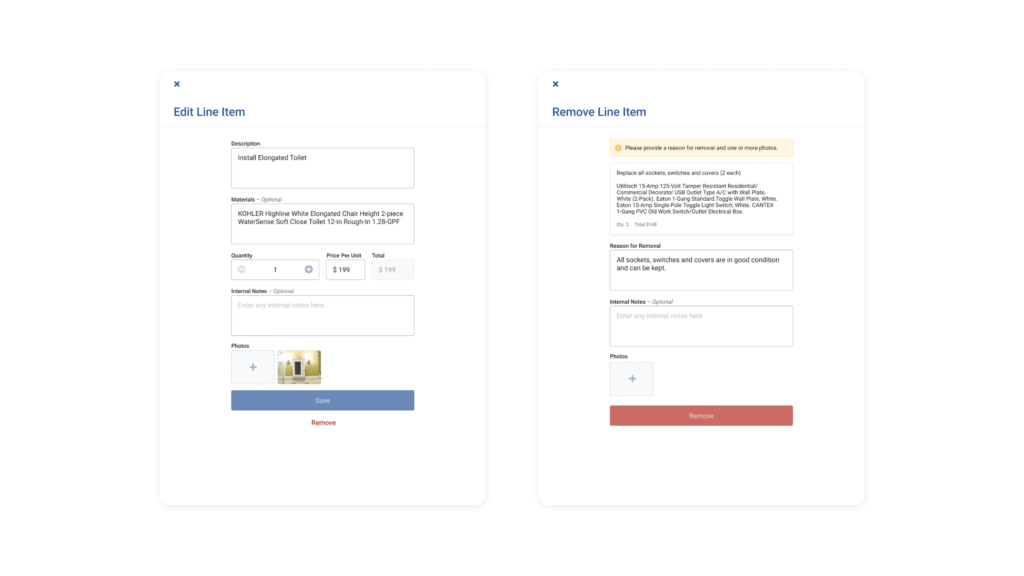
Users could edit, remove or add new work to the inspection document by tapping the line item card. Here they were able to edit the description, materials, quantity and price. They could also make internal notes. If the user needed to remove a line item, a reason for removal and photo are required for submission.
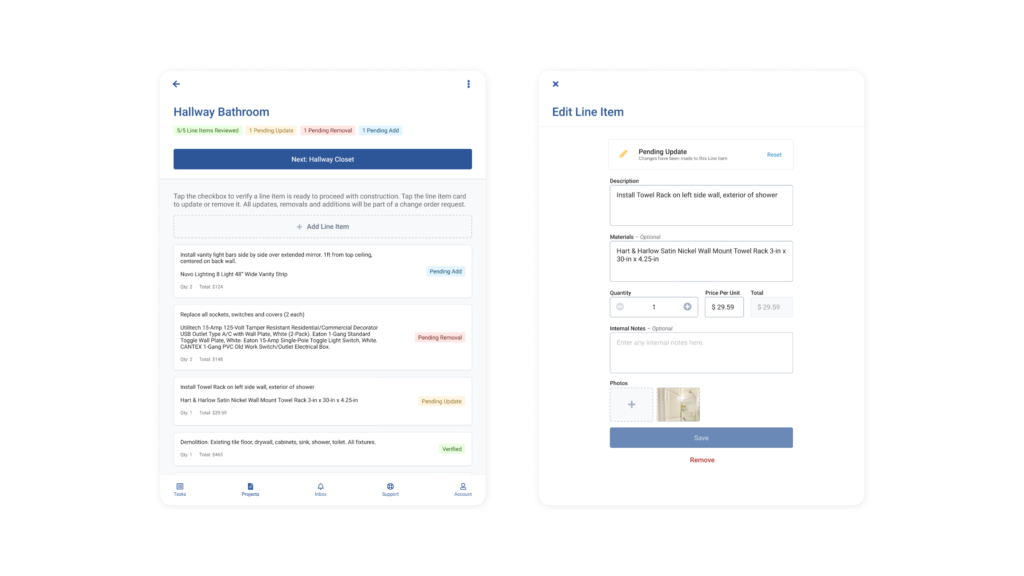
Once an add, edit or removal is made, the line item will be tagged pending update. The item could be reset at anytime during the walk without the update being submitted. Once all line items had been reviewed or updated, the category was considered complete and a CTA would appear to automatically take the FPM to the next category in the walk.
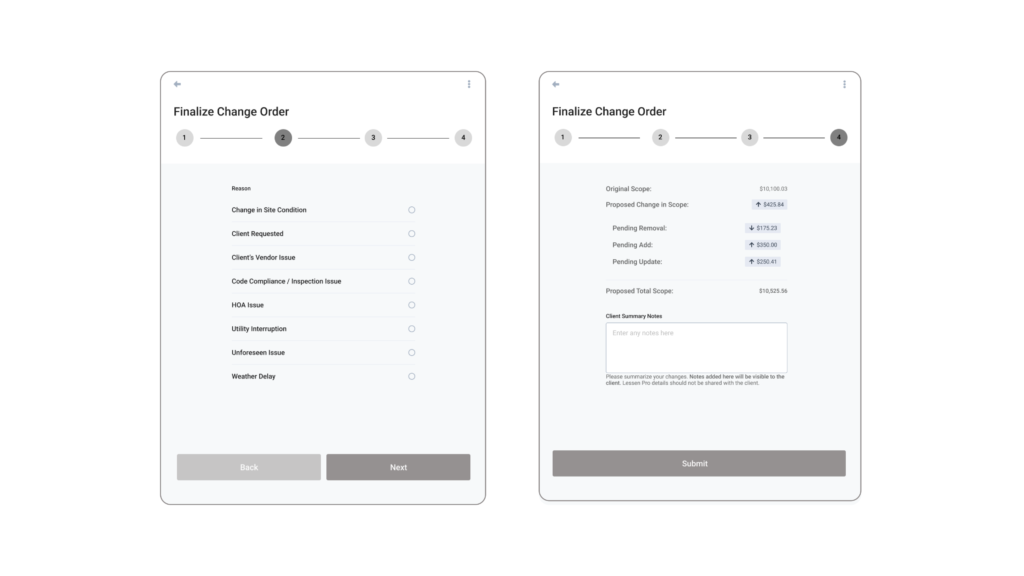
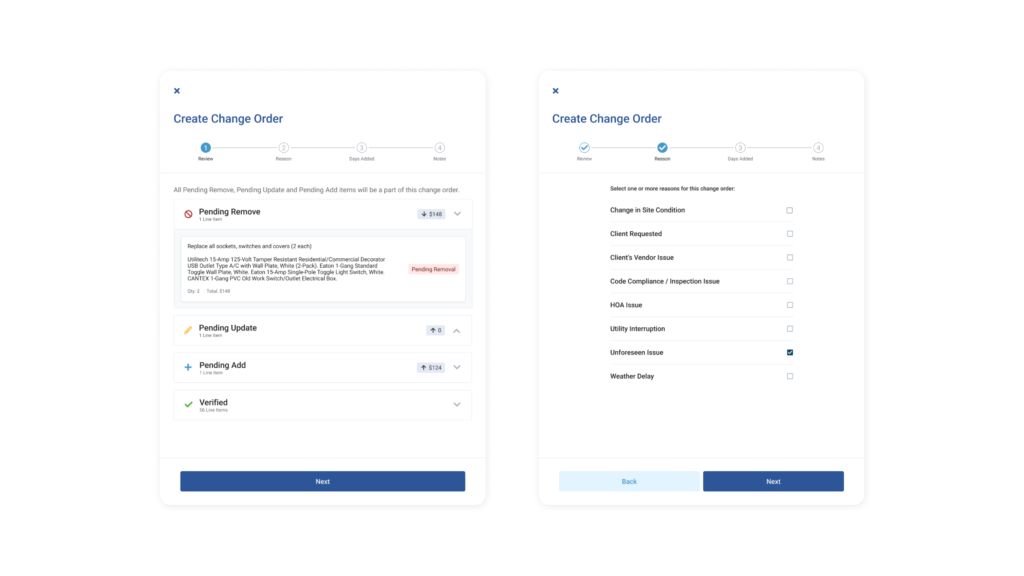
Once all categories are complete (each line item in the walk has a status) a change order would then need to be submitted to complete the walk. A change order is a compilation of all line items that have been edited, removed or added. The user can view all of these line items in status buckets to ensure they’re accurate, and then select one or multiple reasons for the changes.
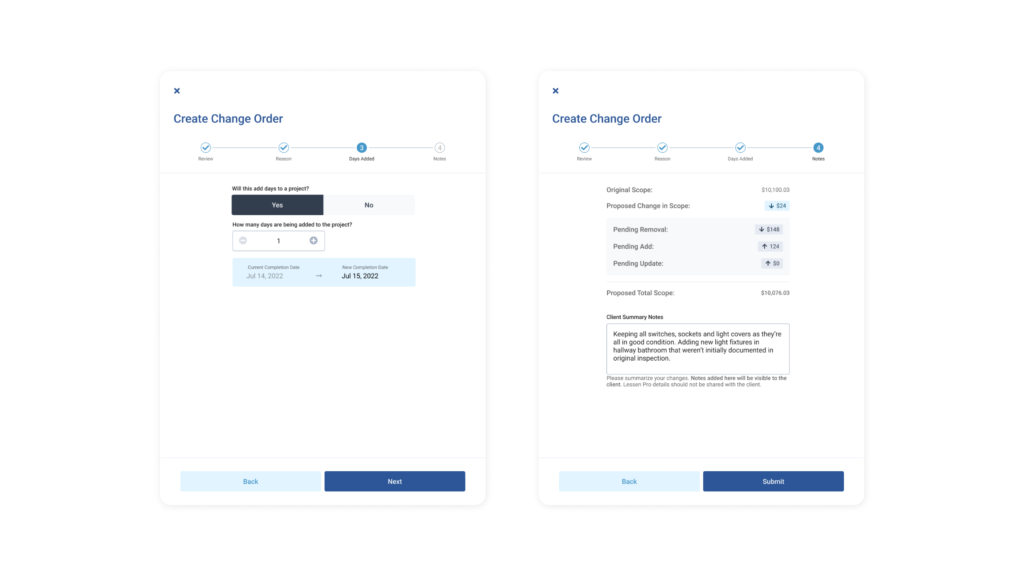
Users also need to submit a new date for completion for the product based on the changes they are submitting. Once they confirm the days added, the final step is to review changes in scope (price) and submit any needed notes before officially completing the walk and submitting it for review.
The app significantly reduced inspection times, with physical walk times dropping from 2 hours to 45 minutes on average. Post-walk reconciliation times fell from 1-2 hours to mere minutes. User adoption exceeded expectations, with the entire internal team using the tool within a month. FPMs appreciated the time savings and organizational improvements. Supervisors valued the increased accuracy and transparency in reconciliation. The successful launch and positive feedback enabled the team to focus on further feature development. Post-launch, based on user feedback, subtotals were added to line item cards, and a key was added at the top of category pages. Performance enhancements were made to the media service, reducing image upload times even in areas with no internet. Additional offline design enhancements improved user experience.
Establishing regular feedback loops and showing work early and often are crucial for large projects with tight timelines. Collaboration and compromise without sacrificing user needs or design integrity are essential for success.
Leading design on this project reinforced the importance of strategy, compromise and continuous learning. The successful collaboration and positive impact made it a rewarding experience.